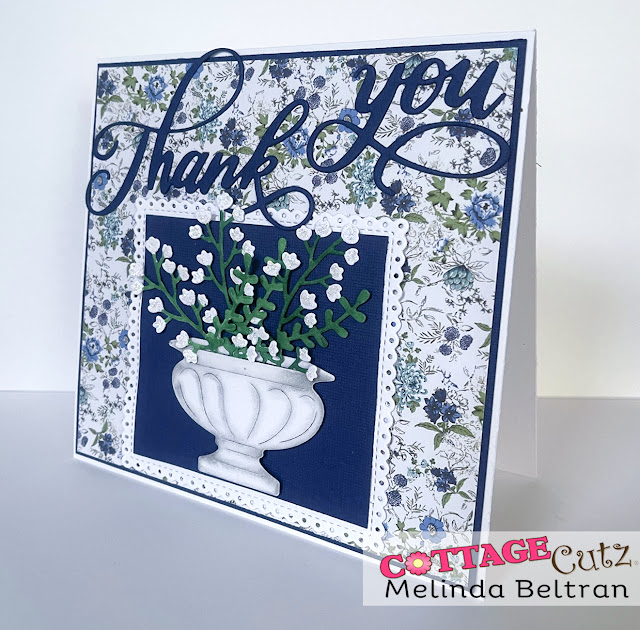
Creating personalized thank you cards is a delightful way to express gratitude while showcasing your crafting skills. In this guide, we’ll walk through the steps to create a quick and stunning thank you card using the new Black Friday Cottage Cutz dies. Whether you’re an experienced crafter or just starting, this project is easy to follow and produces beautiful results.
Materials You’ll Need:
- White cardstock
- Black Friday Cottage Cutz dies
- Green marker
- Stardust Stickles
- Floral print paper
- Blue cardstock
- Stitched square scalloped eyelet die (or an alternative)
- Chalk for edging
- Scissors or a cutting machine
- Adhesive
Step 1: Cut and Prepare Your Base Card
For this project, I decided to make a top-folding card measuring 5.5 x 5.5 inches. The larger size works beautifully with the big, bold sentiment. Start by cutting your white cardstock to size, ensuring it will be able to fold easily into the card base. A top-folding card adds a professional touch and allows for plenty of room to decorate.
Once you have your card base cut, you’ll want to gather all your dies and cut out the various pieces from your white cardstock. Having all the elements ready in advance will make the process smoother as you start assembling the card.
Step 2: Add Dimension to Your Elements
To give your card more depth and texture, begin by adding chalk to the edges of your urn die cut. Chalk is a simple but effective way to create shading and dimension. The goal here is to make the urn look like the concrete or cement urns you often see in gardens. Gently apply the chalk around the edges to enhance this effect.
Next, use your green marker to color the stems of the flowers. For an added touch of elegance, leave the tips of the flowers white, which creates a nice contrast against the green stems. Once colored, apply a thin layer of Stardust Stickles to the flower tips. This will give them a subtle sparkle and make the flowers stand out more on your card.
Step 3: Assemble the Card
Now that your elements are prepared, it’s time to start assembling your card. First, mount the urn and flower die cuts onto a piece of blue cardstock. This background will help your die cuts pop, especially if you choose a shade of blue that complements the floral elements.
Next, cut a square from your stitched scalloped eyelet die and mount it on top of your blue cardstock. This adds an extra layer of design to your card, creating a beautiful frame for your die cuts. If the stitched nested scallop square die is out of stock, don’t worry—you can find similar alternatives that will still give you the same elegant effect.
Step 4: Add the Sentiment and Finishing Touches
For the sentiment, I used the phrase “Thank You” and cut it out from the same dark blue cardstock to maintain consistency. A bold and large sentiment can be the focal point of your card, making it easy to express your gratitude in style.
Place the sentiment at the top of the card to balance the design, then adhere all the layers onto the card base. Ensure everything is lined up perfectly, as small adjustments can make a big difference in the final look.
Step 5: Create Extra Dimension with Mat Layers
To add more interest and depth to the card, cut an additional piece of blue cardstock slightly larger than the stitched square. Then, use a floral print paper as an extra mat layer beneath the blue cardstock. The contrast between the solid blue and the patterned floral print helps highlight the delicate details of the die cuts while giving your card a polished, professional finish.
Final Thoughts
Creating this thank you card was a fun and rewarding project. The bold sentiment combined with the intricate details of the die cuts makes for a standout card that’s sure to impress. Plus, using materials like Stickles and chalk adds just the right amount of texture and sparkle.
If you’re new to cardmaking, don’t worry—this project is easy to follow and perfect for beginners. You can experiment with different colors, papers, and designs to make each card unique. Whether you’re thanking someone for a gift or simply expressing appreciation, a handmade card adds a personal touch that store-bought cards just can’t match.
Cricut Birthday Card Designs
cricut logo maker
monogram designs for cricut
cricut logo design
christmas font cricut
